wmlogo022021

Groundhog Day is Feb. 2! Here's a super easy treat to make!


Happy Groundhog Day! Make it fun for the kids when you prepare this cute & easy groundhog treat for them, using the tasty ingredients you already have on hand. Older kids can prepare this for younger siblings.

For each snack, you'll need two slices of bread, Nutella spread, 2 banana slices, two raisins, and and two peanut halves, and half a grape. So simple, right?

Make your own Hot Cocoa Bombs!

cocoa bombs
I don’t know who first came up with the idea of hot cocoa bombs, but in recent years, these little gems have been trending as a must-have addition to your festive mug of hot milk or water. Many local sweet shoppes and independent bakers start taking orders for bombs in the late fall / winter.

Interested in making your own? We did all the Googling for you and curated a list of 5 of the best recipes online, based on recipe reviews/comments and website credibility. Enjoy!

NOTE: For starters, these silicon molds were the BEST ones we found on Amazon (ad) based on user reviews for hot cocoa bombs, so order them now so they’ll be on hand for when you’re ready to use them.

molds

Shugary Sweets - This recipe is our favorite from the list, because instructions are super clear, and the photos show you exactly what to do! 

Real Simple

Hallmark Channel

Borderlands Bakery - Lots of options involved with this recipe, if you want to spend more money on supplies and do something extra special.

Note Quite Susie


13 Minutes to DELICIOUS Ice Cream in a Bag

ice cream bag1
When I was little, I used to want to make homemade ice cream, but I never knew the science of it. So I would mix my ingredients, throw everything in a bowl, and place it in the freezer for hours, only to end up with a rock-solid frozen concoction that nobody wanted to eat.

Cut to me decades later, and I’m older, wiser, and now I know how to make soft, fluffy ice cream that’s creamy and delicious! The best part? There’s no need to purchase an ice cream maker, and the kids will enjoy making this – from start to finish – in 13 minutes flat.

You’re going to flip when you see the ingredients list. It’s super simple, but trust me, the ice cream tastes SO good. The only item that you’ll need that you might not already have at home is rock salt. You can buy it from Walmart or pretty much any basic needs / grocery store. Some stores sell it near the ice cream makers; other stores sell it near the regular table salt.

So here you go. Are you ready? It’s probably the simplest recipe you ever made!

You’ll need:

  • One cup of whipping cream
  • 1/8 teaspoon of vanilla extract
  • 2 Tablespoons of Sugar
  • A pinch of salt

Here’s what to do:

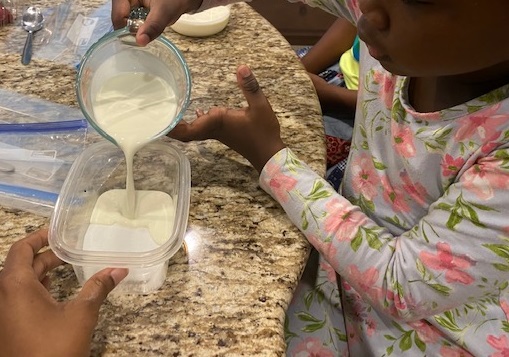
  1. In a small resealable plastic bag, combine whipping cream, sugar, and vanilla. Push out excess air and seal.
  2. Into a large resealable plastic bag, combine about 5 cups of ice and salt. Place small bag inside the bigger bag and shake vigorously, 7 to 10 minutes, until ice cream has hardened. WARNING: You'll need oven mitts or gloves to keep this up for 10 minutes! The bag gets extremely cold! 
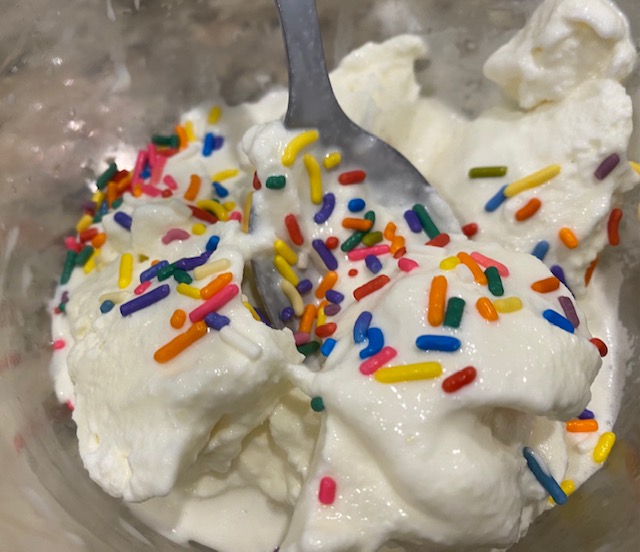
  3. Remove from bag and enjoy with your favorite ice cream toppings.

ice cream bag2rThe science behind making ice cream in a bag is that when salt is added to ice, it lowers the melting point of ice to below freezing. This allows you to shake the bag long enough (before the ice in the larger bag completely melts) to get the ice cream in the smaller bag to solidify. So your concoction gets really cold really quickly (mere minutes), much colder than what it would be if you were just using ice without the salt. And because you’re shaking your bag continuously, the mixture is creamy and the perfect consistency of ice cream!

Feel free to experiment with different topics and different base ingredients. (Some recipes use half & half instead of whipping cream.)

ice cream bag3

Switch up breakfast / lunch with this Easy Brunch Quiche

quiche
It’s time to add something new to your table! With a range of ingredients from broccoli to bacon, this easy quiche that features bacon (YES!), broccoli, and mushrooms is a brunch hero. While baking, the cheese gets all melty, and with every bite, the mushrooms add texture and earthy flavor. The ingredients combine together to make something warm, hearty and delicious.

quiche2quiche3

Quiche recipes and generally simple and fun to make, and we love how quickly this one comes together. The frozen broccoli & cheese shortcut is genius!

Find more brunch recipes and cooking ideas at Culinary.net.
 

Easy Brunch Quiche

Serves: 12

1          package (10 ounces) frozen broccoli with cheese

12        slices bacon, chopped

1/2       cup green onions, sliced

1          cup mushrooms, sliced

4          eggs

1          cup milk

1 1/2    cups shredded cheese, divided

2          frozen deep dish pie shells (9 inches each)

  • Heat oven to 350 F.
  • In medium bowl, add broccoli and cheese contents from package. Microwave 5 minutes, or until cheese is saucy. Set aside.
  • In skillet, cook chopped bacon 4 minutes. Add green onions; cook 2 minutes. Add mushrooms; cook 4 minutes, or until bacon is completely cooked and mushrooms are tender. Drain onto paper towel over plate. Set aside.
  • In medium bowl, whisk eggs and milk until combined. Add broccoli and cheese mixture. Add 1 cup cheese. Stir to combine. Set aside.
  • In pie shells, divide drained bacon mixture evenly. Divide broccoli mixture evenly and pour over bacon mixture. Sprinkle remaining cheese over both pies.
  • Bake 40 minutes.
  • Allow to cool at least 12 minutes before serving.

Note: To keep edges of crust from burning, place aluminum foil over pies for first 20 minutes of cook time. Remove after 20 minutes and allow to cook uncovered until completed.

Fun Friday Night Dinners they'll love

fun friday dinner
Ahhh, you've made it through another week! Here are some super easy meals to please your family when you're too tired (or too broke) to go out to eat but you don't feel like cooking. You don't eat these items everyday, so they will be treats for your family. Enjoy!

UNFORGETTABLE homemade cinnamon rolls

cinnamonrolls2
I expected to be on a month's-long journey of trial and error to find an amazing recipe for homemade cinnamon rolls. Would you believe the first recipe I found was the one that  knocked my socks off?

Man, these are so doggone good! They're also simple to make and don't require many ingredients. In fact, the only ingredient I didn't already have at home was the bread flour. 

AmbitiousKitchen.com calls these "The Best Cinnamon Rolls You'll Ever Eat". So how could I NOT start here? So glad I did! The rolls turned out sweet, moist, and delicious!

Visit the website for the recipe and the author's expert tips, but first, here are my own tips:

1. Don't be discouraged if you don't have a stand mixer. I have only a handheld mixer, but I didn't even use that. My 7-year-old and I used our bare hands to thoroughly knead the dough, and I can't imagine that it could have turned out any better.

2. The recipe for the icing calls for unsalted butter. Next time I make these,  I'll use half unsalted and half salted butter. The icing was delicious, but the flavor should be brought out just a tad more. This simple change will do the trick!

3. Start early. I like popping pre-made cinnamon rolls and cookie dough in the oven on a whim. Homemade is a whole new ballgame. It'll take you several hours start to finish to make these rolls, especially if you'll have a young child helping like I did. Plan ahead, and give the dough time to fully rise both times.

These mouthwatering, fluffy rolls are totally worth it!

Here are mine, ready for the oven:

cinnamonrolls1